
之前说到了,如何在qemu上,运行riscv kernel。下面说一下,如何使用eclipse+GDB,在qemu平台上调试kernel。
${SIFIVE_DIR}是freedom-u-sdk开源项目的本地跟目录。
一、配置bbl
配置bootloader,生成调试信息。
进入到${SIFIVE_DIR}/work/riscv-pk目录,这个目录是编译riscv-pk的目录。
执行如下命令:
rm $SIFIVE_DIR/work/riscv-pk/*
cd $SIFIVE_DIR/work/riscv-pk
PATH=$SIFIVE_DIR/work/buildroot_initramfs/host/bin:$PATH $SIFIVE_DIR/riscv-pk/configure \
    --host=riscv64-buildroot-linux-gnu \
    --enable-logo \
    --with-logo=$SIFIVE_DIR/conf/sifive_logo.txt
CFLAGS="-mabi=lp64d -march=rv64imafdc -g" LDFLAGS='-g'  make PATH=$SIFIVE_DIR/work/buildroot_initramfs/host/bin:$PATH -C $SIFIVE_DIR/work/riscv-pk
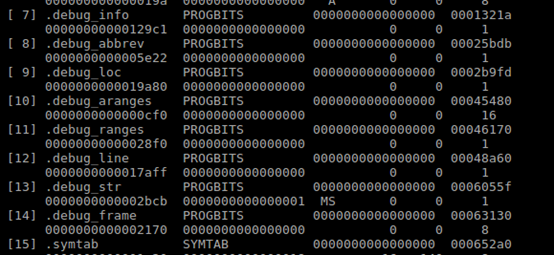
编译完成后,使用readelf -S bbl,查看生成的bbl,是否带有debug信息。有.debug*段即可。主要是给CFLAGS和LDFLAGS变量,加上-g参数。
二、配置kernel
配置kernel,生成调试信息。
进入到${SIFIVE_DIR}/linux目录,执行
make ARCH=riscv menuconfig O=${SIFIVE_DIR}/work/linux。
O选项,指定该目录,是linux kernel的编译目录。
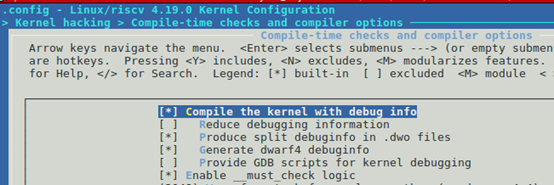
在 kernel hacking->compile-time checks and compiler options 选项页,勾选第一个Compile the kernel with debug info。
重新make O=${SIFIVE_DIR} /work/linux vmlinux,生成vmlinux。
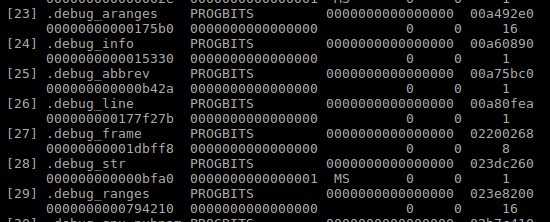
使用 readelf -S vmlinux 查看vmlinux的section,如果有下图所示的.debug**段,说明,vmlinux带了有debug信息。
三、调试方式启动qemu
qemu的-s和-S参数,可以启动调试模式。
$SIFIVE_DIR/work/riscv-qemu/prefix/bin/qemu-system-riscv64 -nographic -machine virt -bios $SIFIVE_DIR/work/riscv-pk/bbl -kernel $SIFIVE_DIR/work/linux/vmlinux -initrd $SIFIVE_DIR/work/initramfs.cpio.gz -netdev user,id=net0 -device virtio-net-device,netdev=net0 -s -S
四、eclipse连接
启动eclipse工具,先建一个project。
project建立好之后,配置debug。
在main界面,选择project为刚刚建立的project,勾选Disable auto build。

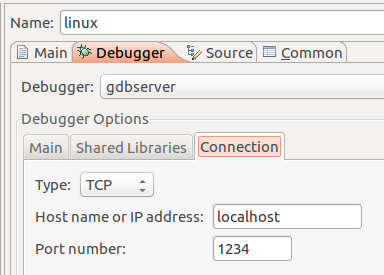
在debugger界面,Debugger选择gdbserver,配置DGB调试器的路径,这里使用riscv64-unknown-linux-gnu-gdb。

我本机上的gdb版本是8.2。
|
lujun@lujun-host:~$ /opt/riscv-gcc/bin/riscv64-unknown-linux-gnu-gdb -version GNU gdb (GDB) 8.2.50.20181127-git Copyright (C) 2018 Free Software Foundation, Inc. License GPLv3+: GNU GPL version 3 or later <http://gnu.org/licenses/gpl.html> This is free software: you are free to change and redistribute it. There is NO WARRANTY, to the extent permitted by law. |
connection选项页,host name填localhost,port填1234。qemu的-s选项,会创建1234端口,用于gdb连接调试。
设置完毕之后,选择右下角的debug。开启调试。
五、调试bbl
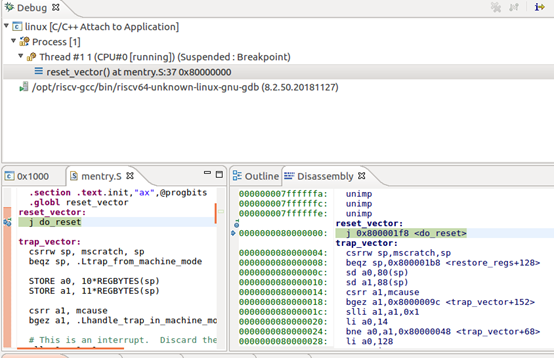
启动调试之后,在debug子界面,选择Process[1]->Thread#11->0x1000。0x1000表示,此时cpu停在了0x1000地址处。这个地址也就是riscv-qemu的复位地址。
点击view Disassembly,可以看到反汇编。

在console界面,会有如下的warning提示,并且没有显示0x1000地址的反汇编。因为这个时候cpu执行的指令,是在qemu中固化的。因此不能调试。
|
Type "apropos word" to search for commands related to "word". warning: No executable has been specified and target does not support determining executable automatically. Try using the "file" command. 0x0000000000001000 in ?? () |
在console界面,输入如下命令,载入bbl,设置断点为bbl的起始label,
|
file /home/lujun/work/sifive/freedom-u-sdk/work/riscv-pk/bbl b reset_vector |
执行结果如下:
|
file /home/lujun/work/sifive/freedom-u-sdk/work/riscv-pk/bbl A program is being debugged already. Are you sure you want to change the file? (y or n) [answered Y; input not from terminal] Reading symbols from /home/lujun/work/sifive/freedom-u-sdk/work/riscv-pk/bbl... b reset_vector Breakpoint 1 at 0x80000000: file /home/lujun/work/sifive/freedom-u-sdk/riscv-pk/machine/mentry.S, line 37. |
file命令,是载入一个elf程序。b命令设置一个断点。bbl的起始执行的label是reset_vector。
点击eclipse工具的run按钮,启动执行。过一会,cpu就会在设置的断点处停下来。我们就可以调试bbl的程序。
六、调试kernel
通过file命令,载入vmlinux,设置断点为start_kernel。
|
file /home/lujun/work/sifive/freedom-u-sdk/work/linux/vmlinux A program is being debugged already. Are you sure you want to change the file? (y or n) [answered Y; input not from terminal] Load new symbol table from "/home/lujun/work/sifive/freedom-u-sdk/work/linux/vmlinux"? (y or n) [answered Y; input not from terminal] Reading symbols from /home/lujun/work/sifive/freedom-u-sdk/work/linux/vmlinux... Error in re-setting breakpoint 1: Function "reset_vector" not defined. b start_kernel Breakpoint 2 at 0xffffffe00000063c: file /home/lujun/work/sifive/freedom-u-sdk/linux/init/main.c, line 536. |
点击eclipse工具的run按钮,启动执行。过一会,cpu就会在设置的断点处停下来。我们就可以调试kernel的程序。

七、总结
借助qemu,eclipse以及GDB工具,我们可以对bbl和kernel进行调试。
这个版本的GDB有点问题,需要改代码,然后重新编译生成。大家在遇到的时候,直接百度错误结果,根据百度结果修改代码,重新编译即可。